


DEFENCO ACRITAS
February 5, 2016How to Upgrade or Change OS of PCs with Preinstalled Windows 8.1 & Windows 10
March 9, 2016
Prerequisites
We will need:
- An ISCSI enabled Network Attached storage, like QNAP.
- 2 PC/Server with equal number of NICs (4+ NICs needed) /RAM and CPU type
- A working active directory domain on Windows 2012 R2
For proper HyperV operation you will need n+1 NICs where n is the number of vms hosted on the hypervisor.
For the cluster we are about to build we need 3 NICs on each node of the cluster, plus n NICs for the n number of VMs we are about to host.
Make a good sketch of your solution, in order to have nic ips/configuration handy at all times during the installation or troubleshooting.
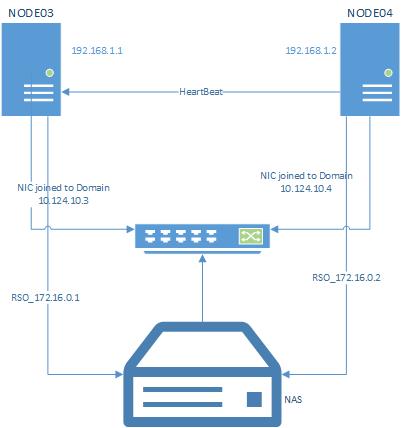
On the sketch above you will identify that each of the nodes (node03/node04) have 3 nics configured (the rest NICs are virtual switched on the HyperV and therefore have no part on this sketch)
- 1x NIC for each node connected to network switch (that’s the interface we will use for joining the pc/server on our domain. On our scenario NODE03 has the ip 10.124.10.3 and NODE04 10.124.10.4.
- 1x NIC for each node connected to the RSO/NAS (directly or via switch). On our scenario NODE03 has the ip 172.16.0.1 and NODE04 172.16.0.2.
- 1x NIC for each node connected to each other (no need for a cross cable if auto mdix is applicable on your NICs-it’s a standard nowadays. We call this the heartbeat cable, where each cluster node gets the status of its partner node. On our scenario NODE03 has the ip 192.168.1.1 and NODE04 192.168.1.2.
Join all on the same domain
Ensure all nodes (hyper –V servers ) and Qnap are joined to the same Active Directory Domain.
Organise and name your nodes NICs
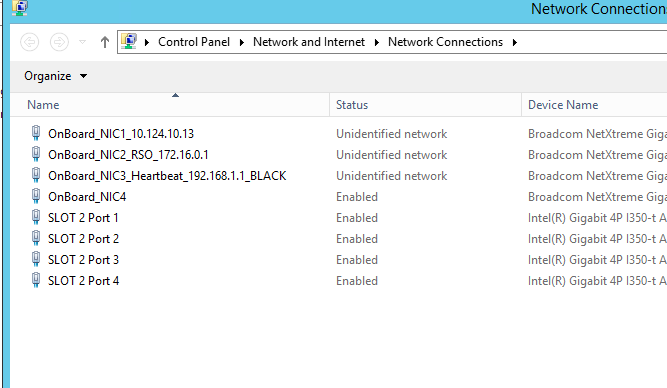
Configure Network cards NICs for Failover Cluster: Rename all Network cards and make names identical on both servers in order to save yourself from auto moving questions of resources. Be very cautious on identifying the physical location of each NIC.
a. Rename all Network cards
b. Rename the Domain Network NIC as Production and deselect unnecessary protocols and features
IPv6 is up to the installers hand to enable or disable. Proceed according to your internal network specs.
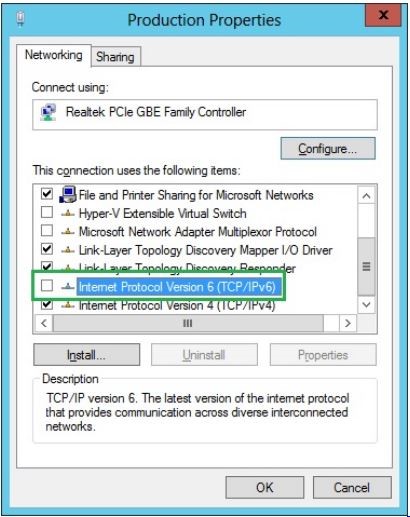
IPv6 should be unchecked.
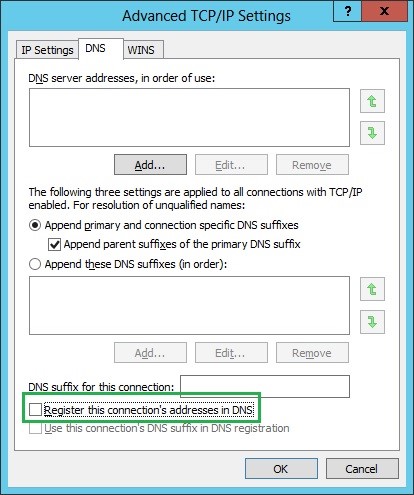
Make sure Register this connection’s address in DNS is checked,
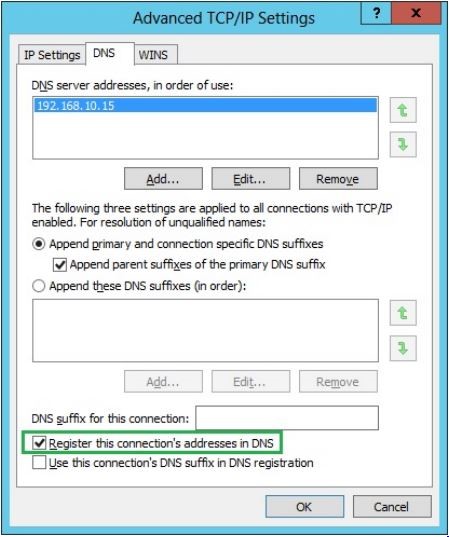
Check option “Register this connection’s addresses in DNS”.
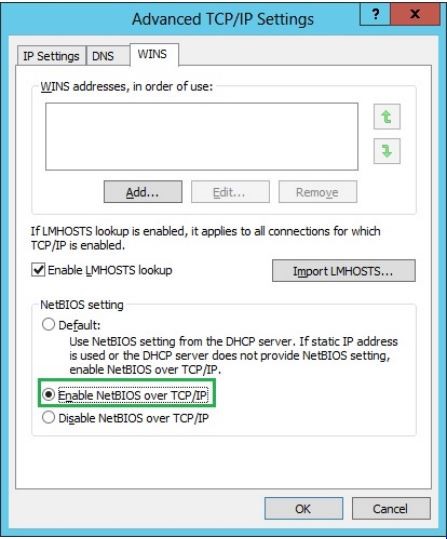
At WINS tab Enable NetBIOS over TCP/IP option.
c. Configure the RSO NICs as RSO and deselect unnecessary protocols and features
IPv6 was deselected on our scenario in order to avoid IPv6 communication failures.
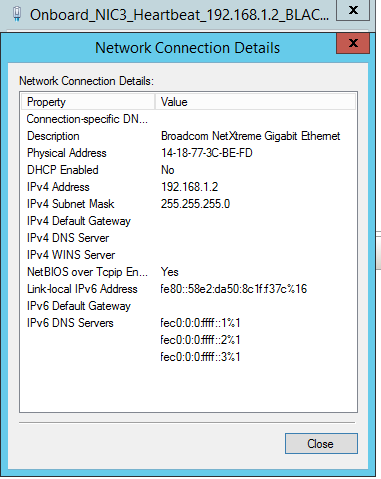
d. Configure the HeartbeatNICs as Heartbeat and deselect unnecessary protocols and features
Uncheck IPv6
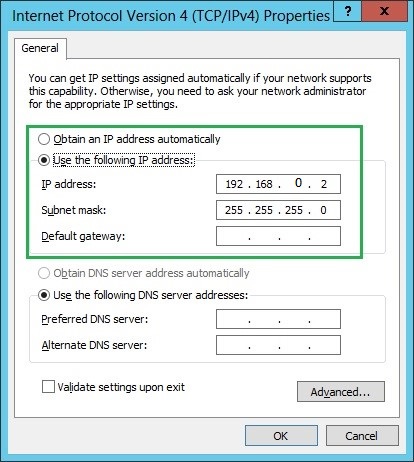
Watch it now! Put the heartbeat ips with no Gateways, no DNS servers.
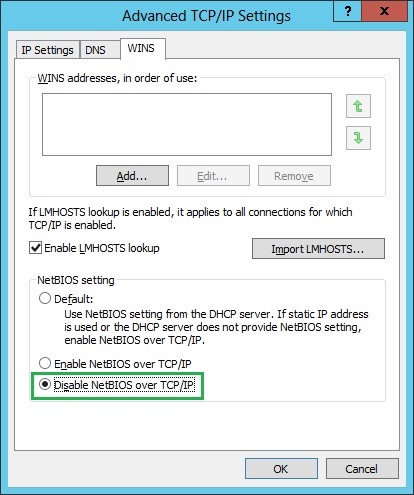
Make sure Register this connection’s address in DNS is NOT checked,
and make sure NetBIOS over TCP/IP is NOT checked!
Your Heartbeat NIC properties should look like this
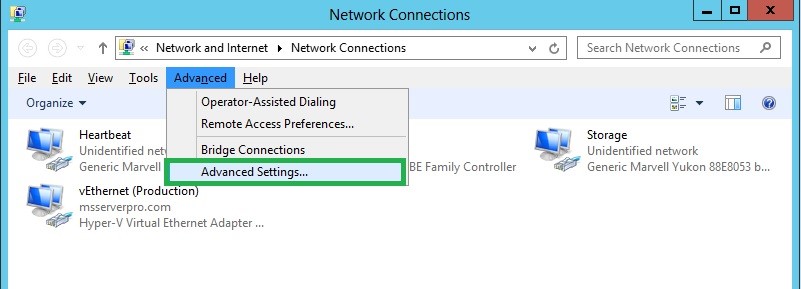
e. Set the Network Priority (arrange binding order)
Navigate to Advanced Settings, though Network and Internet ->Network connections.
Open your network connections and click Advanced>Advanced Settings
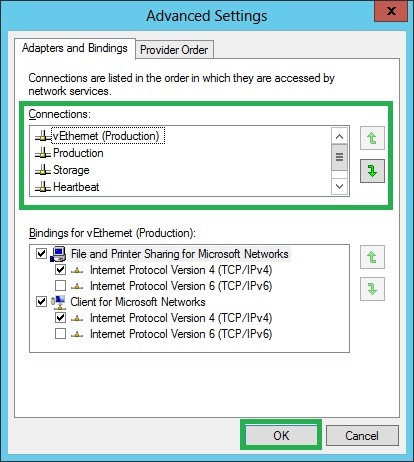
Arrange the adapter binding order as follows:
- Production
- Storage
- Heartbeat
This is very importart to how each node responds and reacts to network requests. If you ommit this step latencies in cluster behaviour related to network access or interoperability with other network resources may occur.
Configure NAS/RSO
We assume you have already configured your Raid. (Best results we have achieved on COTs systems are Raid 10 and Raid 6). On our scenario we used a QNAP with 5 HDD RAID6 array.
a. Configure Shared Storage (iSCSI Target)
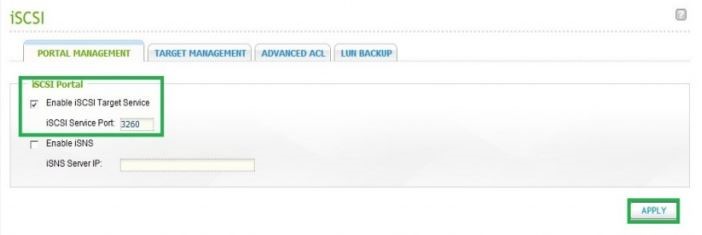
Fire up your ISCSI configuration wizard and enable iSCSI target service on its 3260 default port.
Enable iSCSI Target Service at port 3260
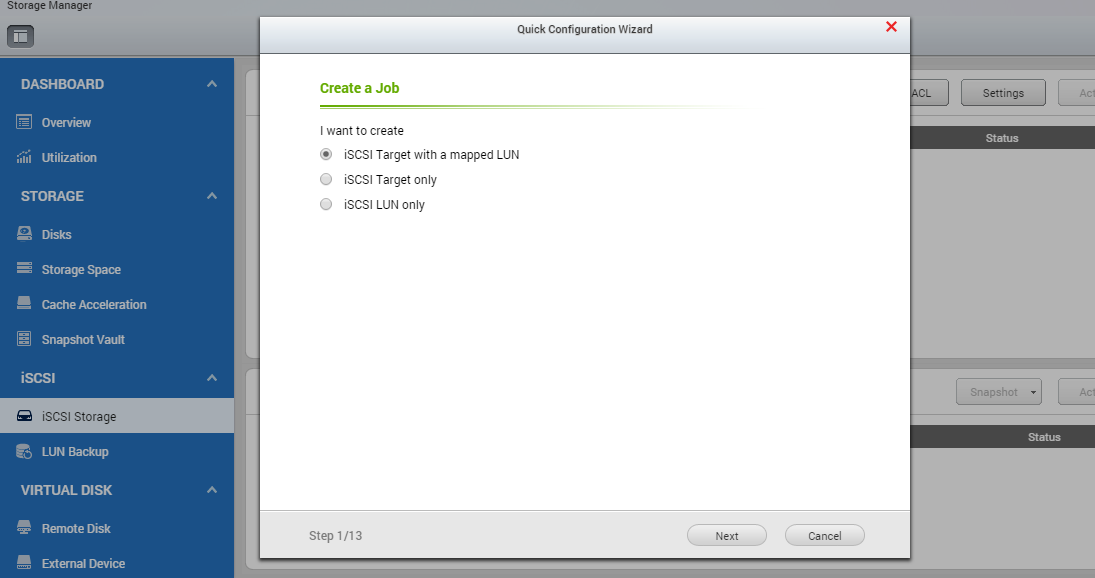
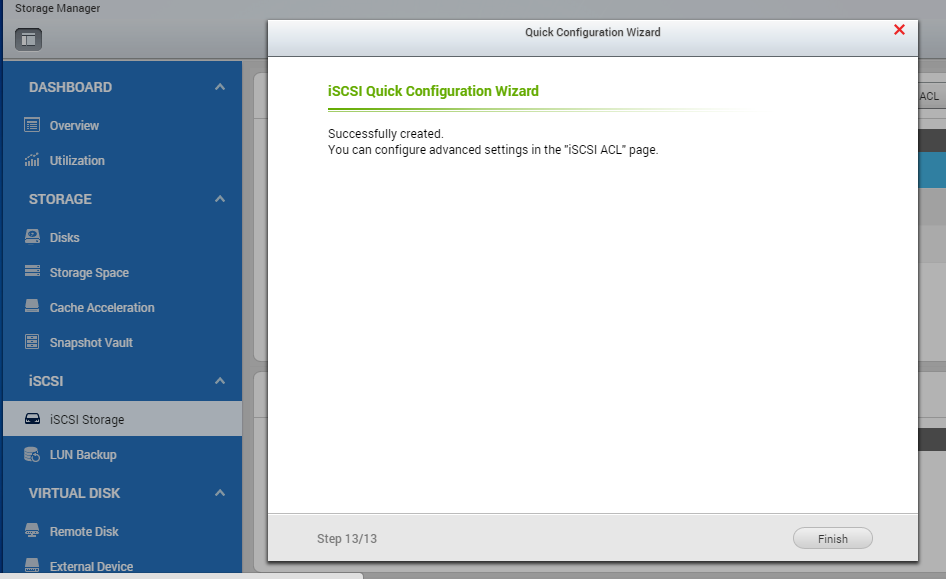
Through iSCSI Storage’s Configuration Wizard,
Select to create iSCSI Target with a mapped LUN(Logical Unit Number).
Create a new iSCSI target with a mapped LUN
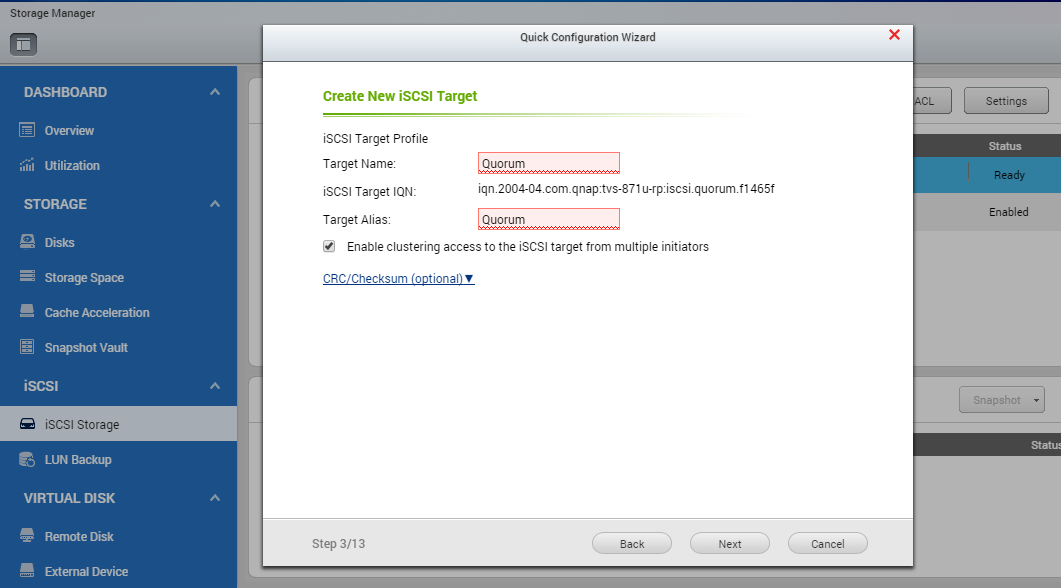
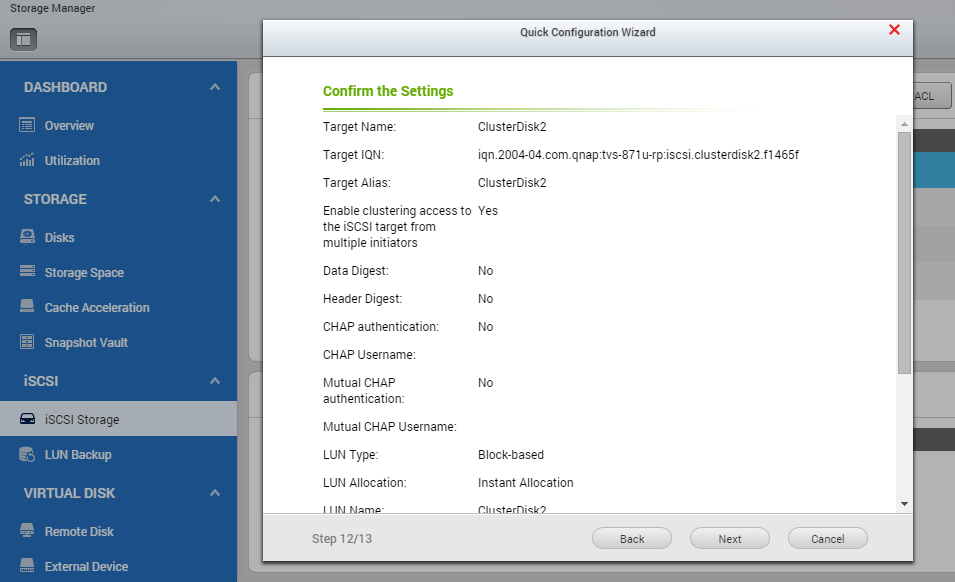
VERY IMPORTANT!
“Target Name” and “Target Alias” should be Quorum.
Clustering access to iSCSI target from multiple initiators must be “Enabled”.
Name it Quorum. That’s the most important shared storage resource of the cluster since the cluster configuration is exchanged between nodes through it.
Make sure you check the Enable clustering access to the iSCSI target from multiple initiators in order to avoid data corruption, occuring on simitaneously iSCSI connections and prepare this part of the storage for CSVFS.
Don’t use chap authentication, unless needed.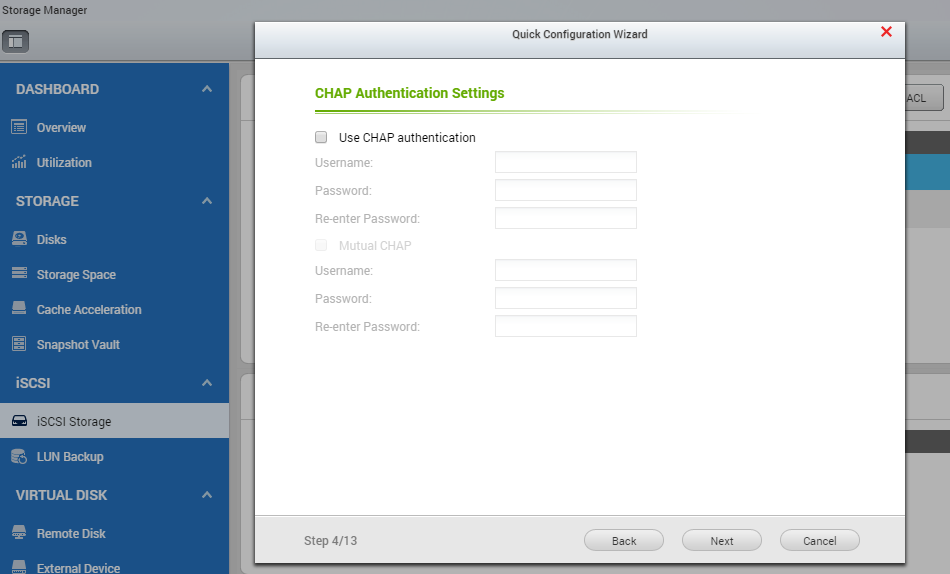
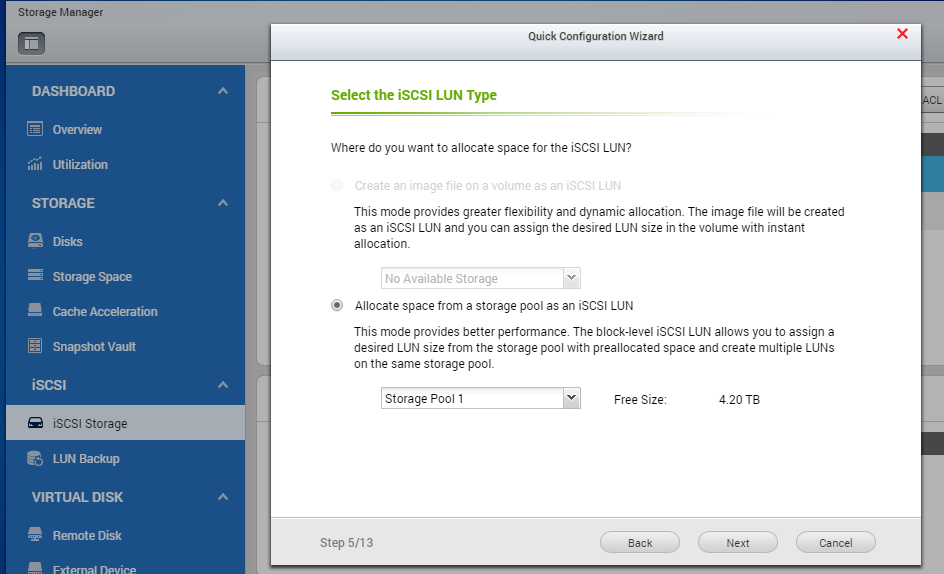
Don’t use more than 1GB for the Quorum, since you will never exceed it.
Allocate space from your storage pool.
For performance purposes we select “Allocate space from a storage pool as an iSCSI LUN”. On the other hand the disk space is pre-allocated making it your Cluster storage more secure in cases of rapid data deployment in the rest of its free disk space.
Proceed making the above steps again 2 times. Each for the following names:
- ClusterDisk1, with allocated space as prefered
- ClusterDisk2, with allocated space as prefered
You need at least one Cluster Disk, in case you need more resources prepare more.
At the iSCSI target list you will see the iSCSI targets you just created.
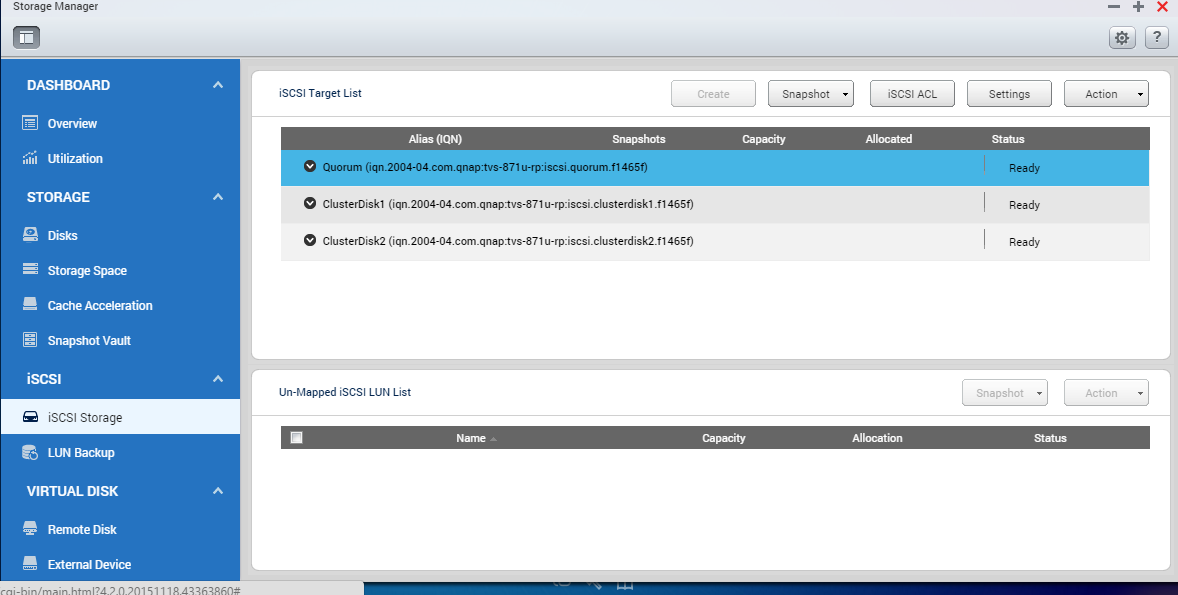
Quorum and Cluster Disks should appear as “Ready” after the initialization of the iSCSI storage.
After finishing with our NAS configuration, we proceed with NODES.
b. Connect to iSCSI targets from both Nodes
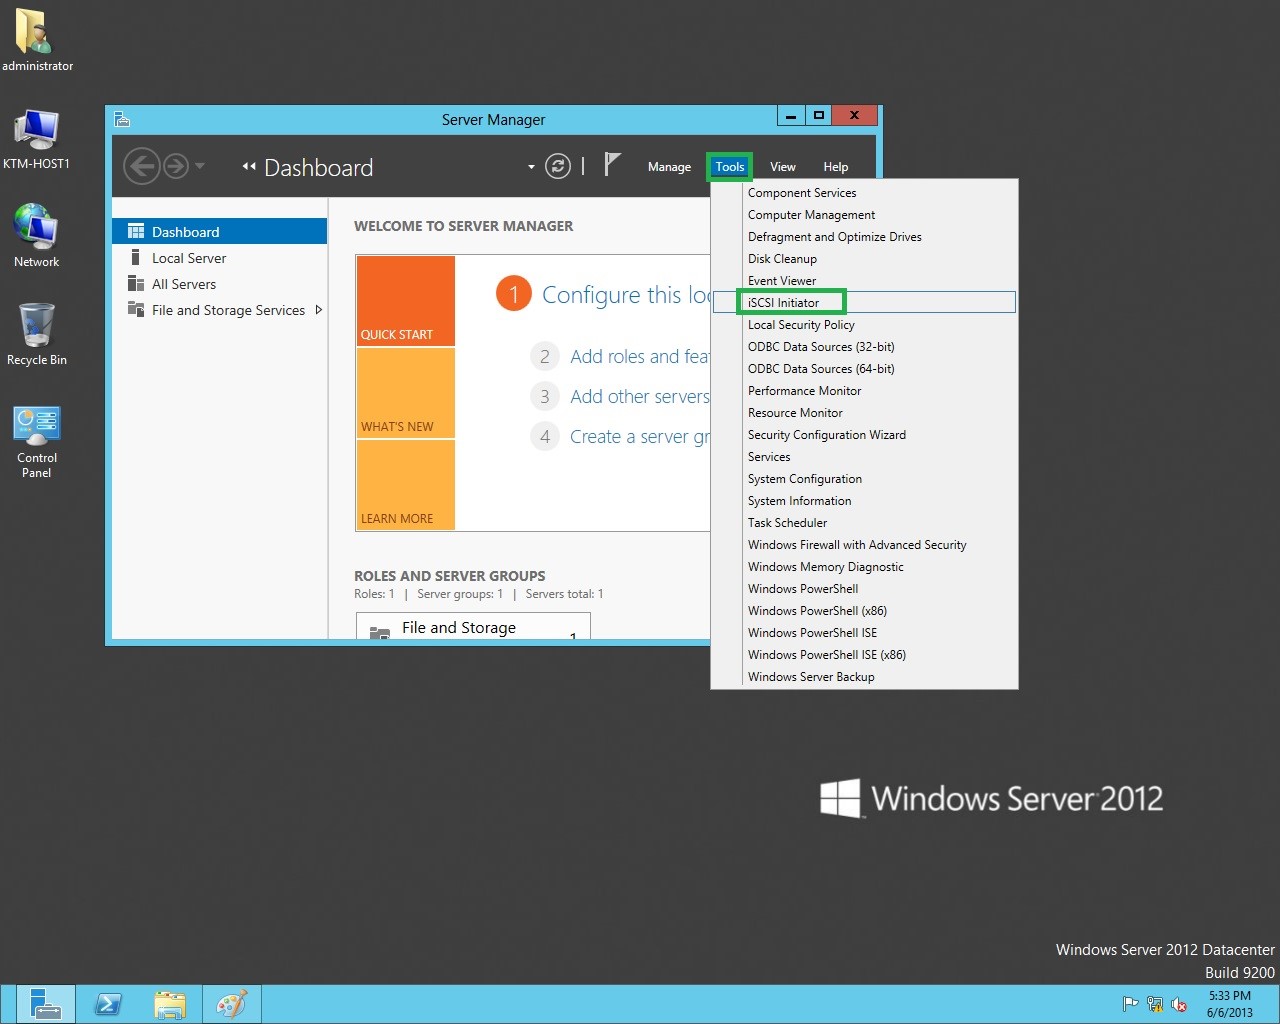
Both Nodes must be connected to our Storage using iSCSI Initiator (though Server management Tools).
From your server manager, select tools iSCSI initiator. A message will come up informing you that the iSCSI initiator service will start automatically next time windows loads.
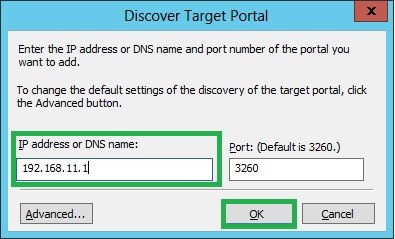
On the discovery tab hit Discover portal
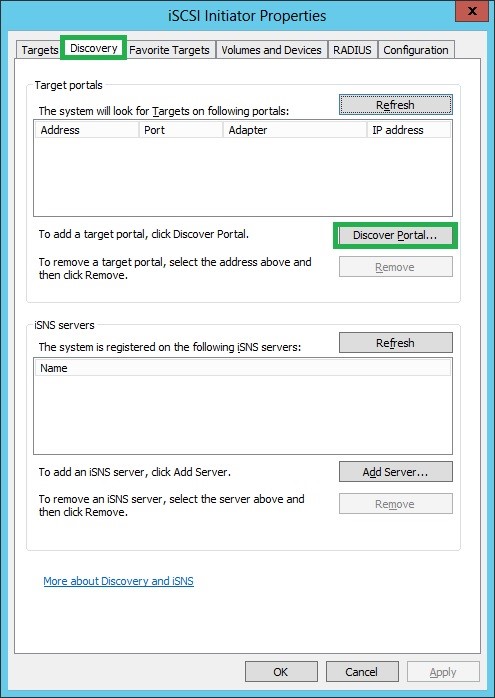
Be rather cautious to put the ip of the RSO belong to the nodes RSO network, eg. on our example 172.16.0.xxx
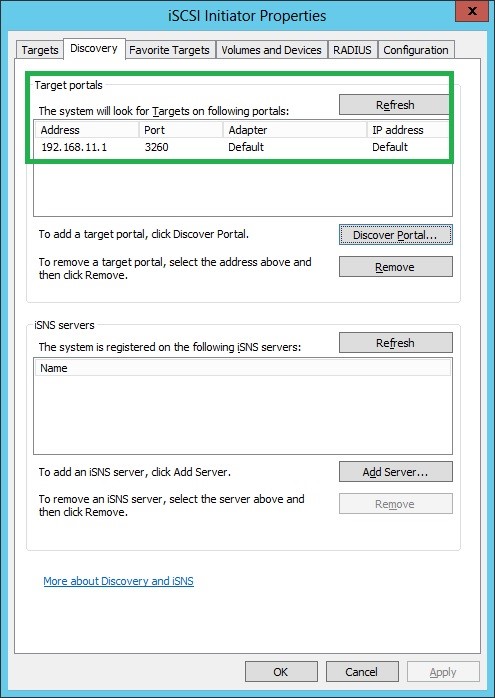
Discovery should find the IP address and Port of your iSCSI target (make sure your cluster nodes RSO nics and iSCSI RSO are on the same switch or VLAN.
Following that, though Targets tab, you should be able to see your disks (including Quorum) as “Inactive”.
Proceed connecting them. Go back on the targets tab, hit refresh and when the list is populated hit connect.
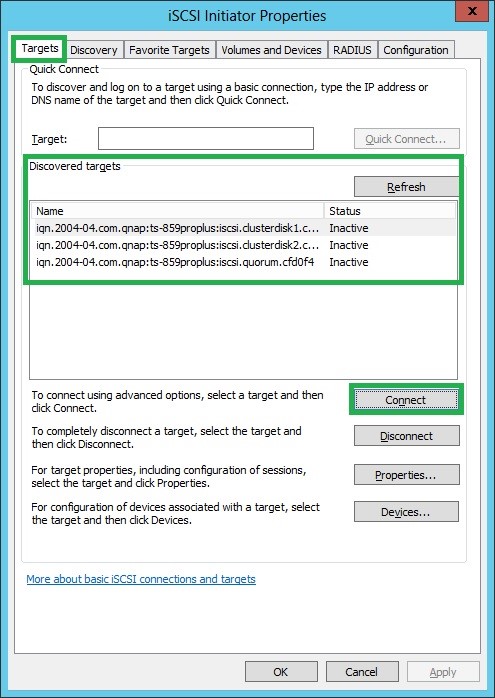
Do the above on both nodes
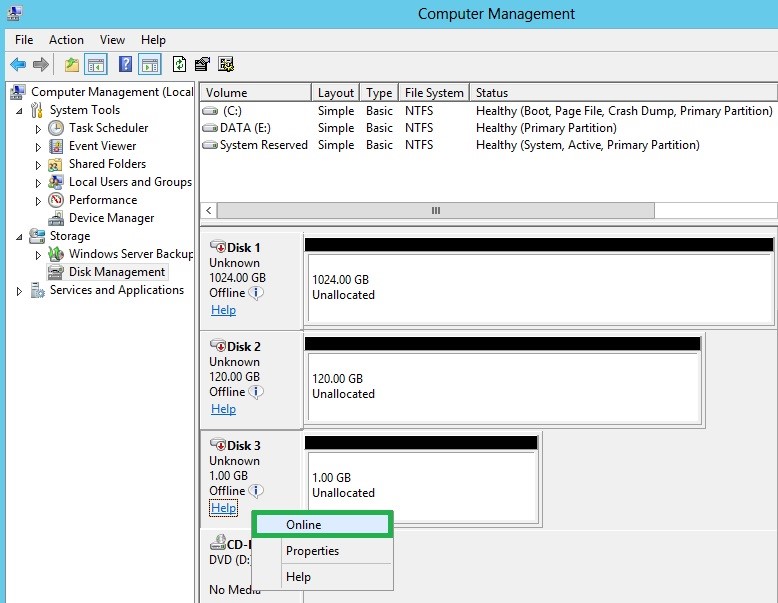
c. Initialize disks
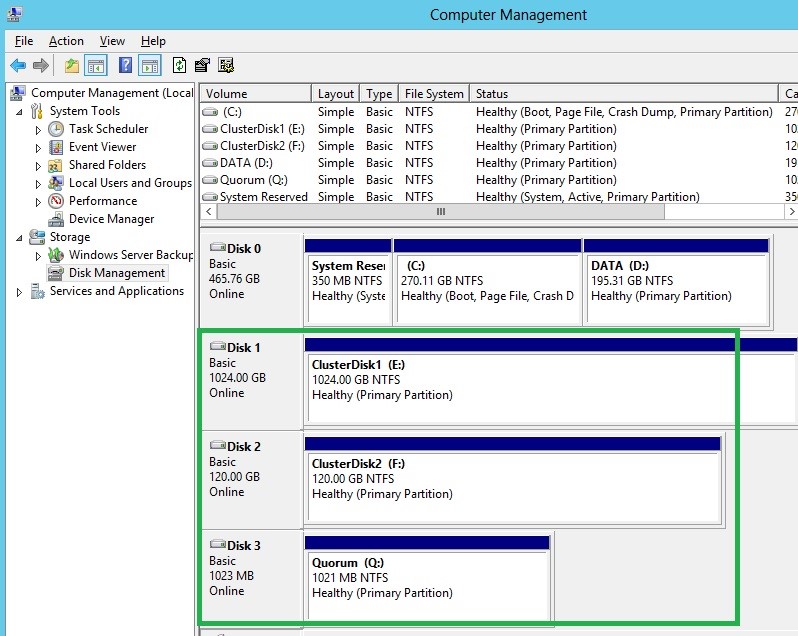
On the first node open Disk Management console. Right click on each of the new hard disks appearing and select online.
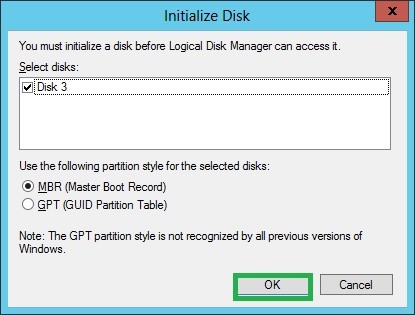
Initialize the disk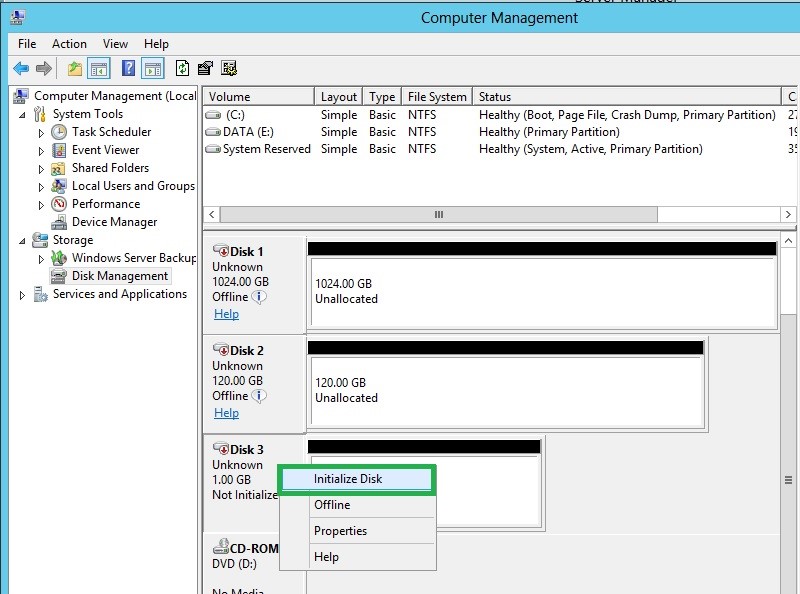
and create a new simple volume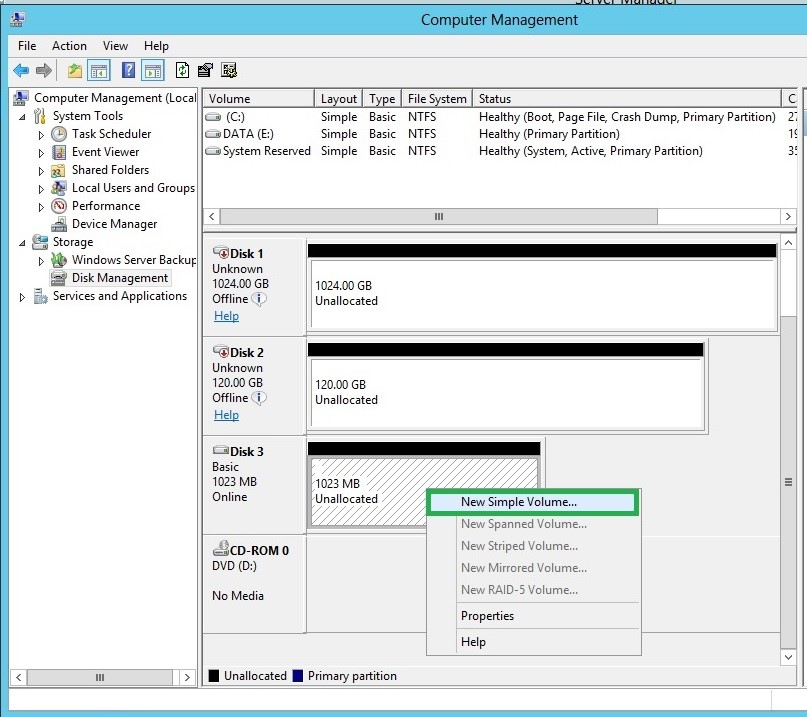
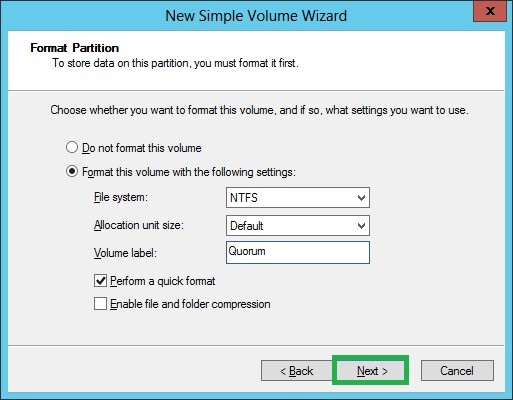
Assign the drive letter Q for Quorum, we don’t care what you put on the rest.

Format it as NTFS and name it Quorum
Proceed with the same process for ClusterDisk1 and 2, put whatever drive letter you like. At the end of the process you will see the below.
Launch disk management on the second node and “online” the already made HDDs.
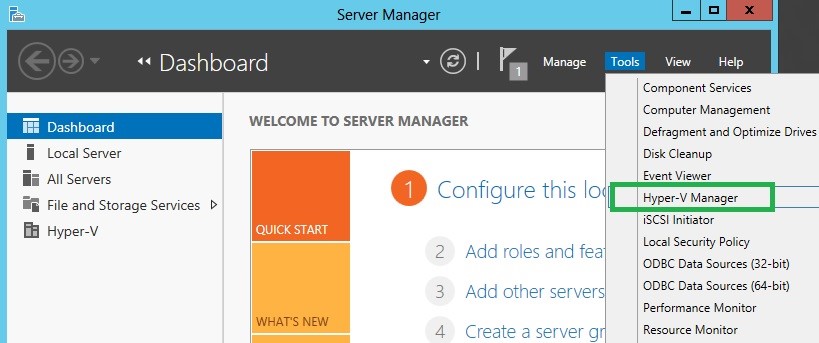
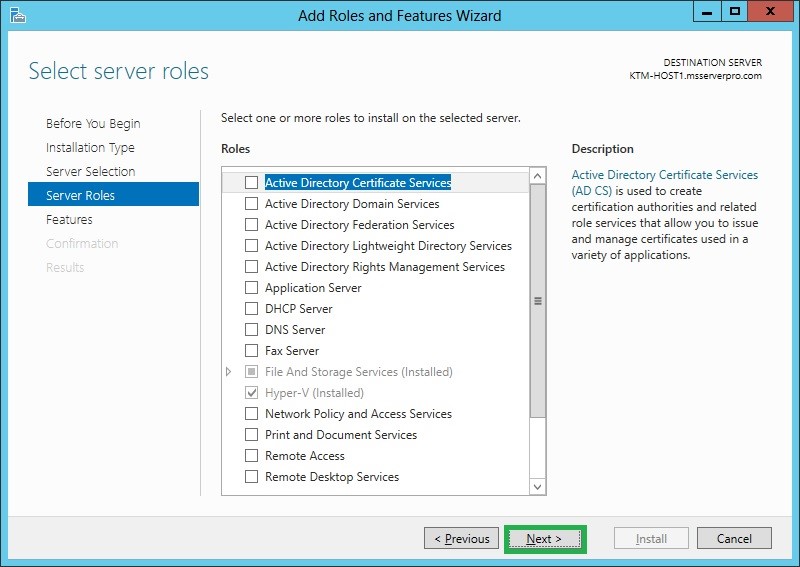
HYPER-V installation on both Nodes
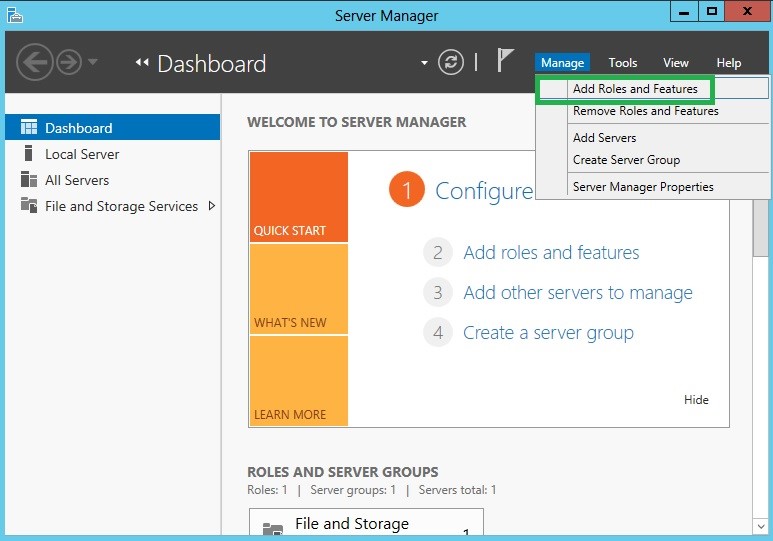
Though Manage Tab, select ”Add Roles and Features”.
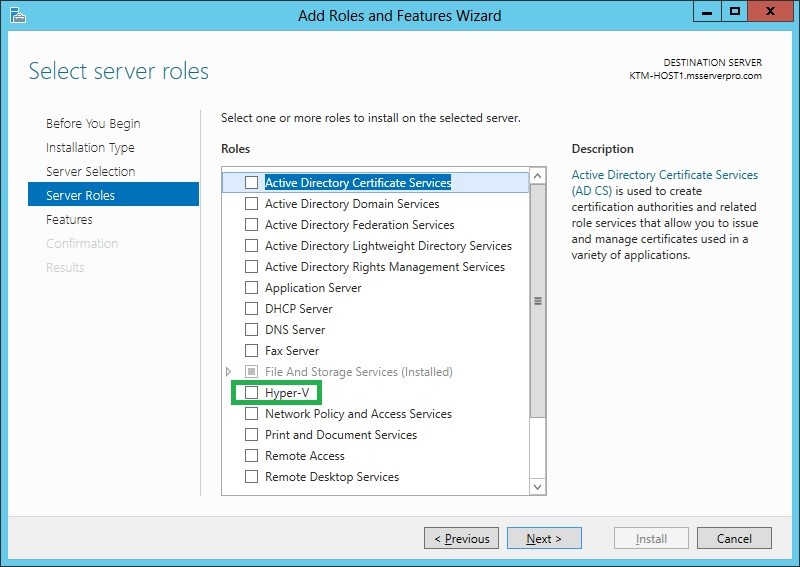
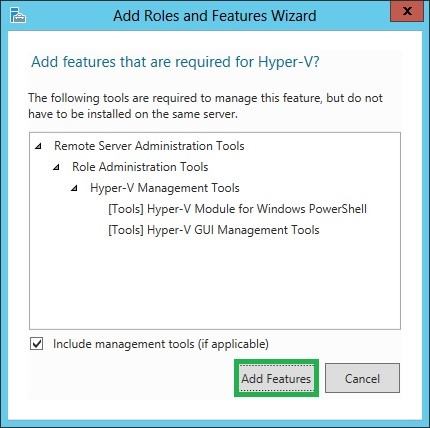
From Server Roles, select the Hyper-V role and proceed.
Include management tools and proceed adding the feature.
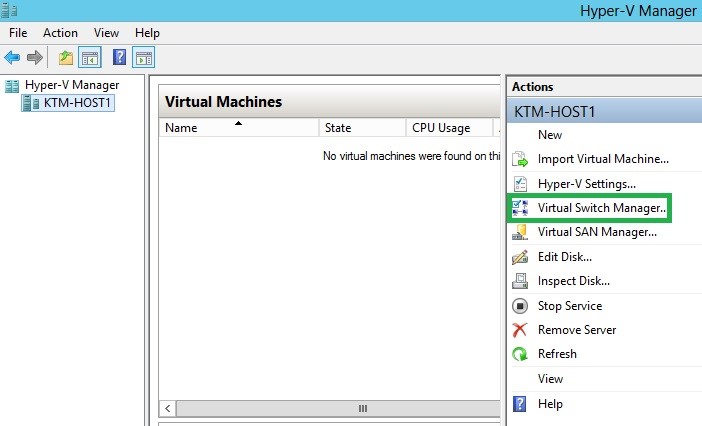
Create Virtual Switch (Production) on both Nodes
On your Hyper-V Manager console select the Virtual Switch Manager action on the right.
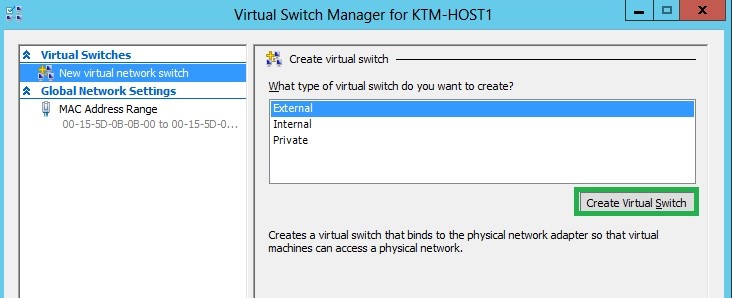
Create a New Virtual Network Switch. Type: EXTERNAL. Make sure you don’t select ANY of your RSO or Heartbeat NICS!
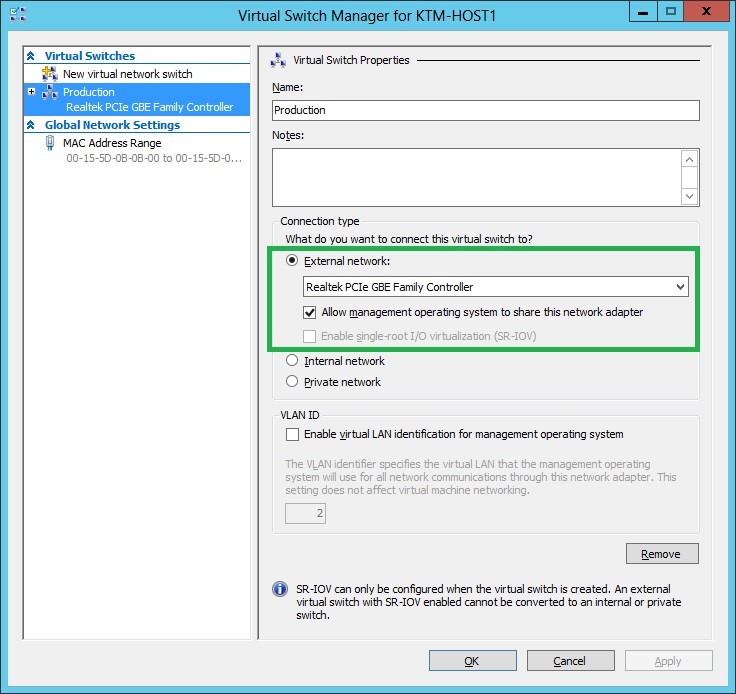
Name the Virtual switch, assign appropriate NIC and check the option “Allow management operating system to share this network adapter”.
Do the same on both nodes.
Install Failover Cluster Roles Features on both Nodes
Through the “Add Roles and Features” we proceed to “Features.
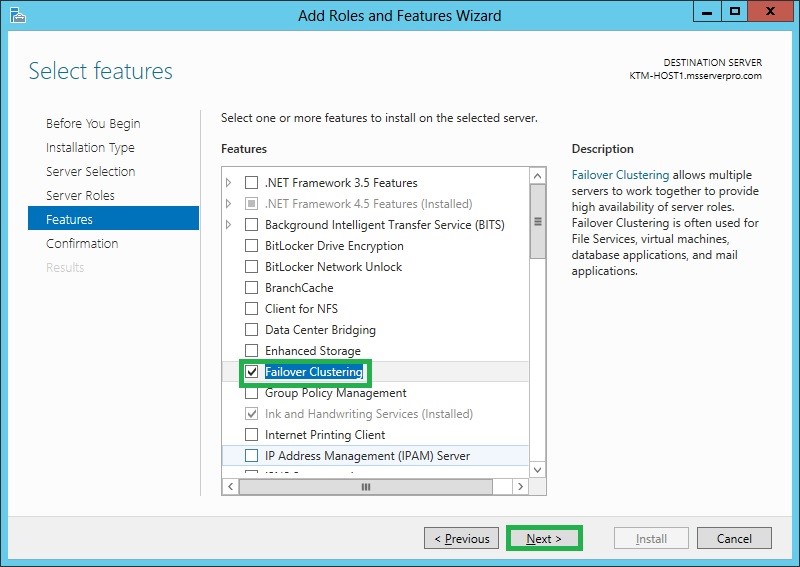
Select the “Failover Clustering” and proceed.
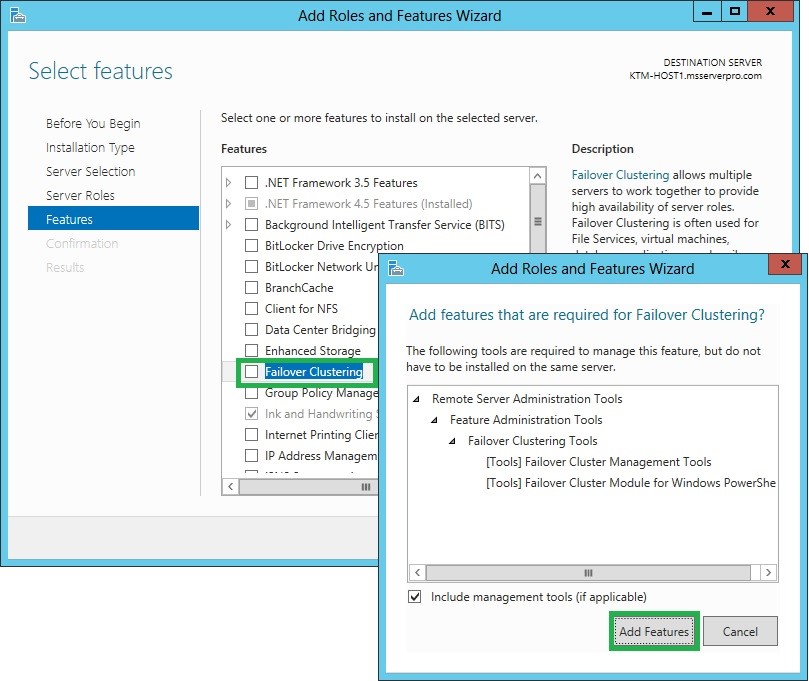
Do the same on both nodes.
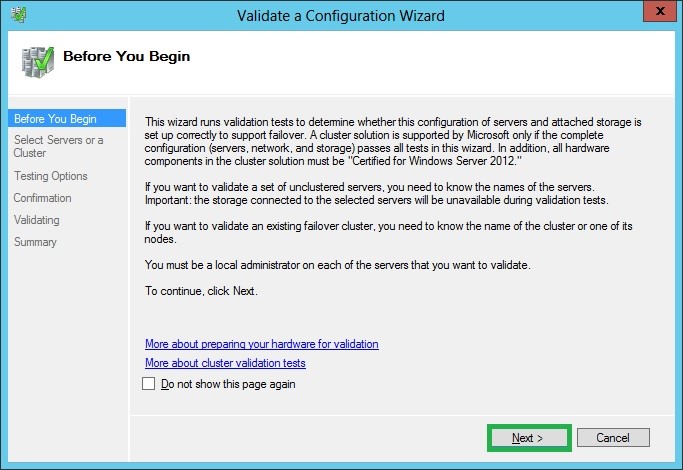
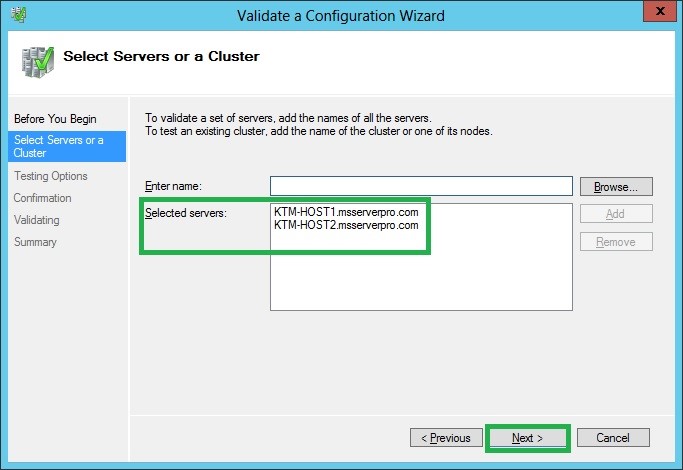
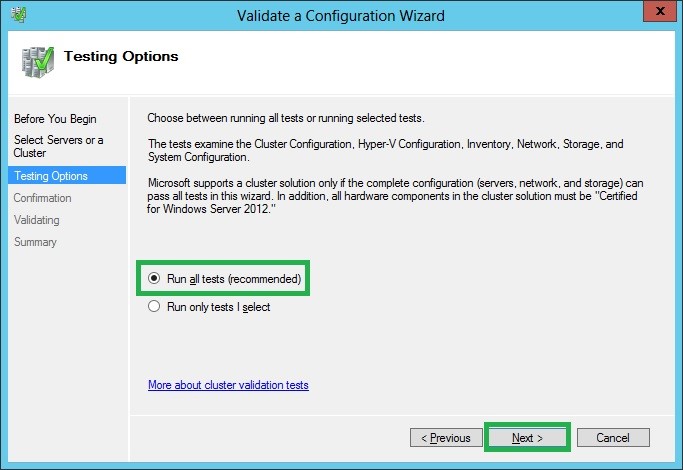
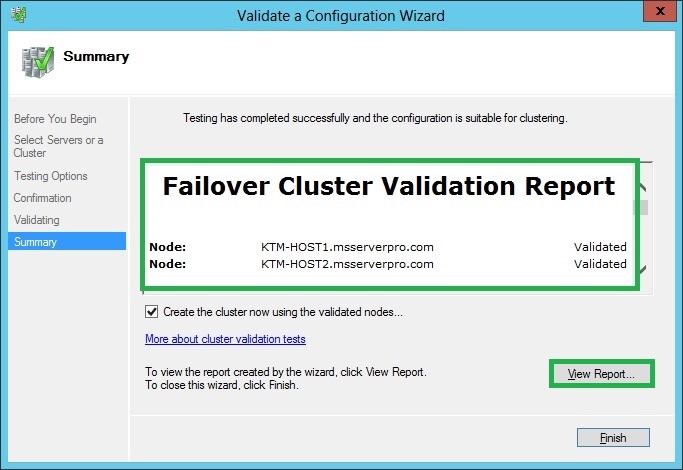
Validate the cluster configuration
Pick up one of the two Nodes and run the Cluster Validation configuration tool.
Next steps shown below will be performed to validate cluster’s failover configuration.
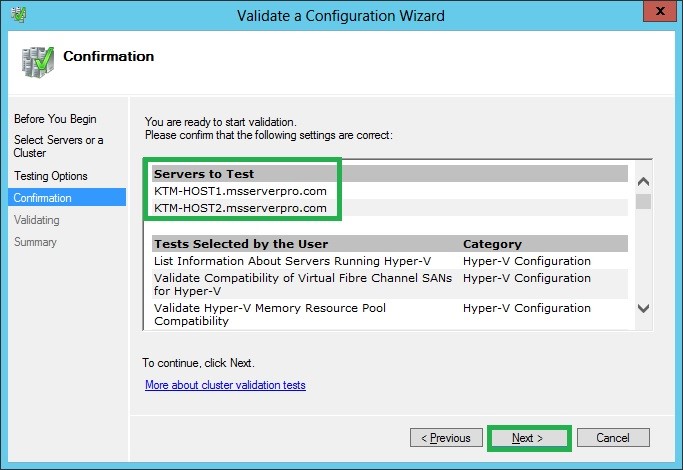
Since all nodes are “Validated” we can proceed creating the Failover Cluster.
Create the Hyper-V Failover Cluster
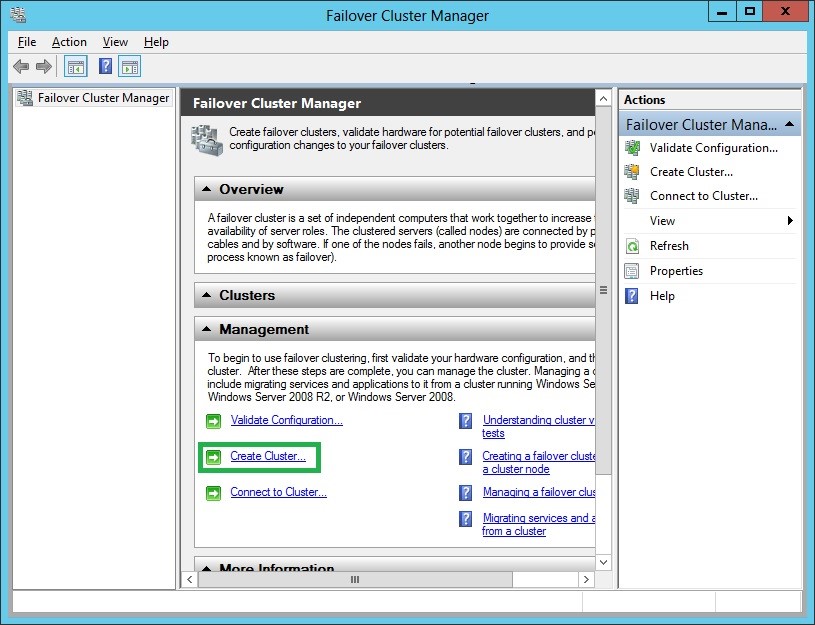
We proceed to create cluster through Failover Cluster Manager.
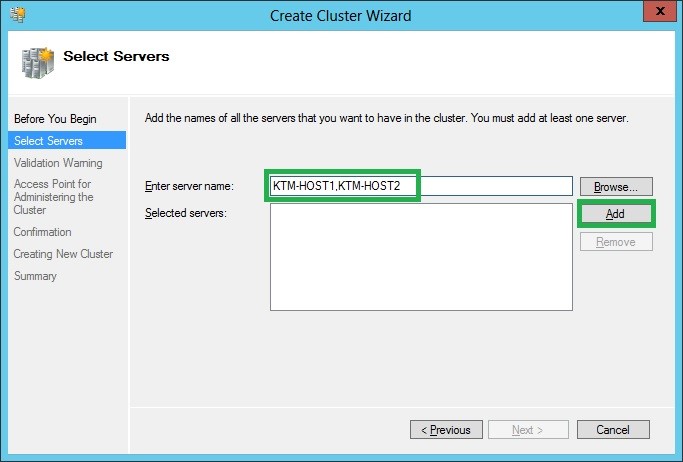
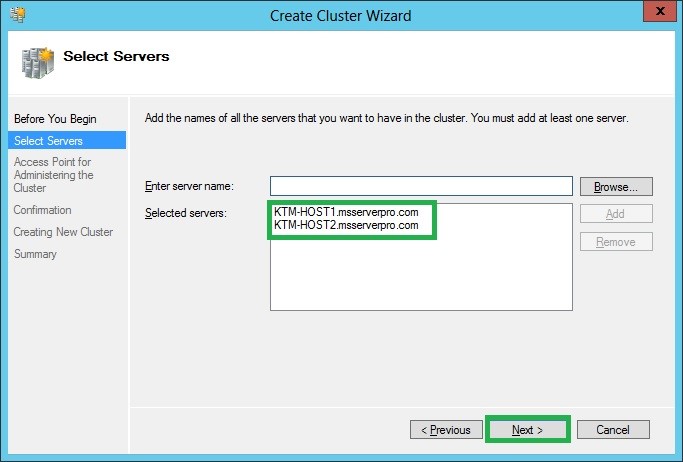
Make sure all required servers have been selected (separated by a comma “,”).
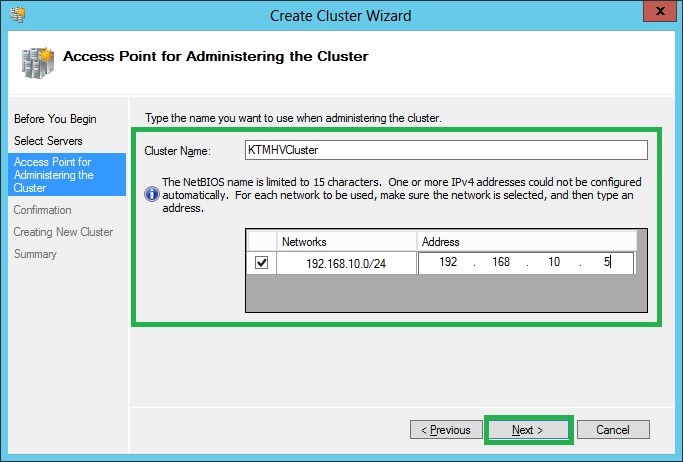
Provide the cluster name, revise that addresses are correct for each network that is part of the Failover Cluster.
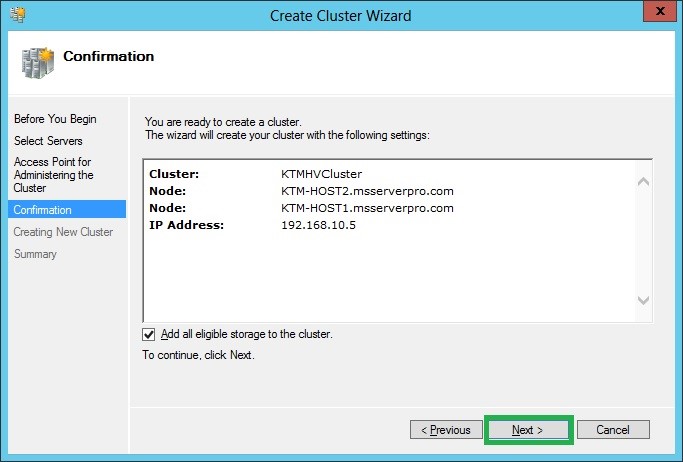

Your Cluster has completed, revise again summary.
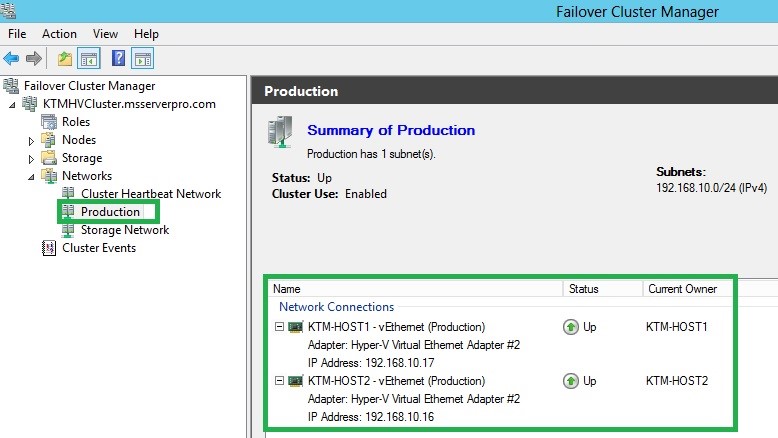
Rename Cluster Networks for easy understanding and mapping to the physical node NICs.
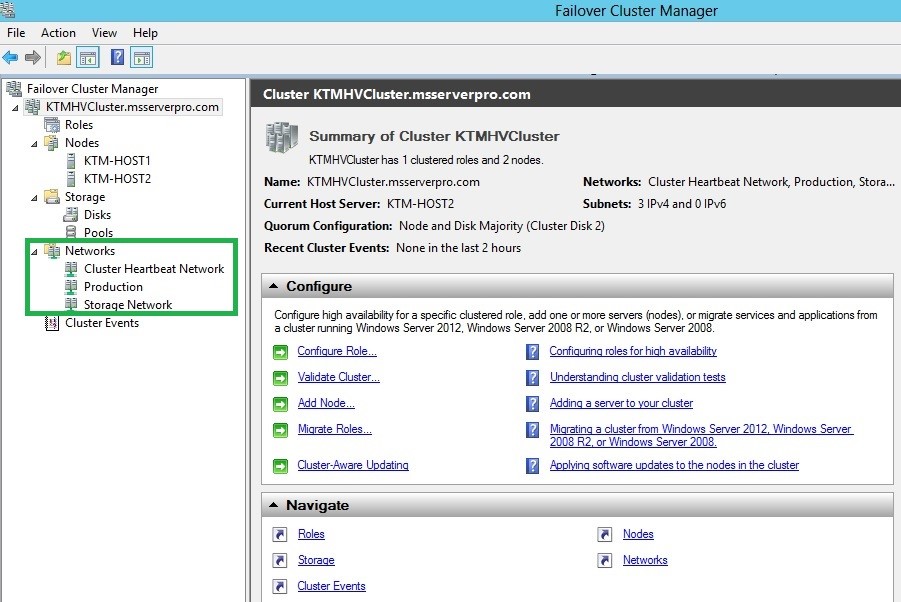
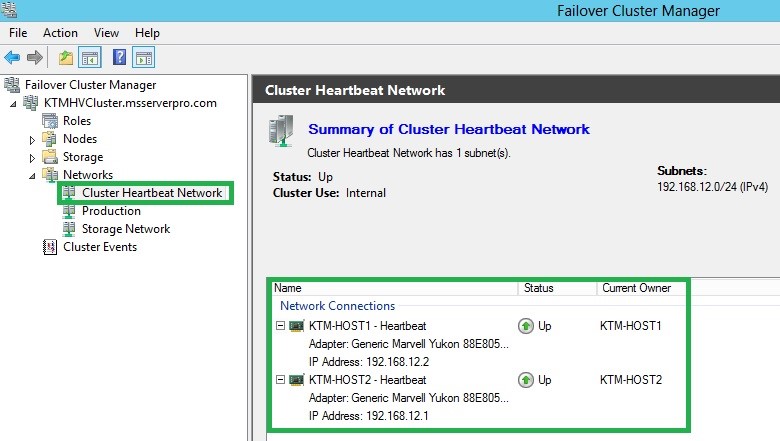
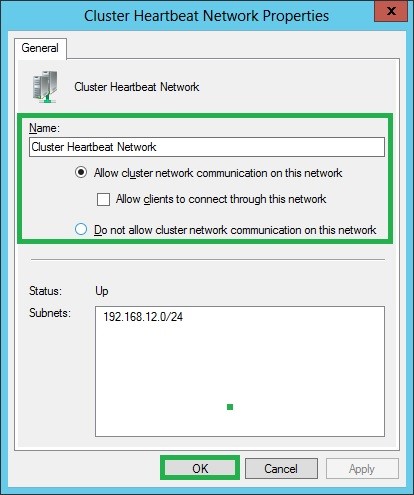
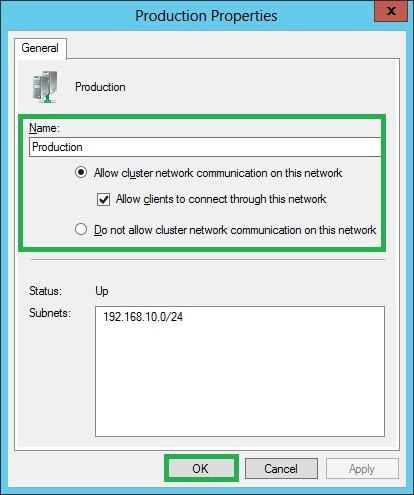
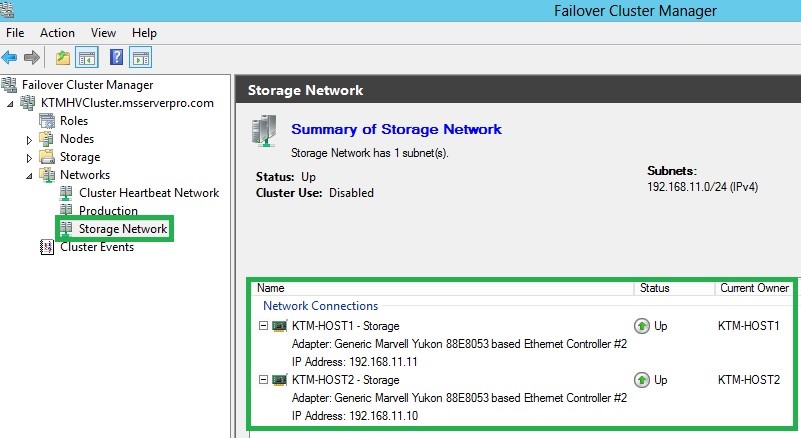
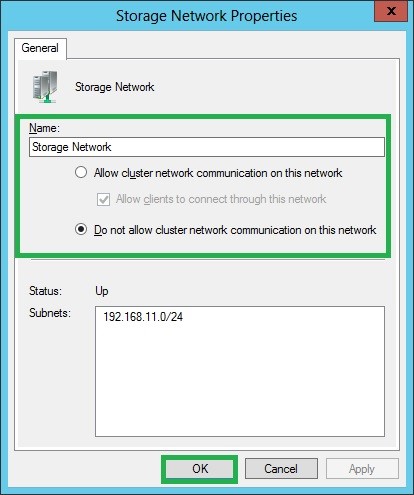
Through Failover Cluster Manager, we configure networks’ names and communication permissions.
Specifically, at Heartbeat network we ONLY allow cluster network communication.
At production Network, we allow cluster network communication AND also allow clients to connect through.
At Storage network we DO NOT allow any cluster network communications.
Also through the above steps, we have the chance to check one again that subnets have been assigned correctly.
Enable Cluster Shared Volumes
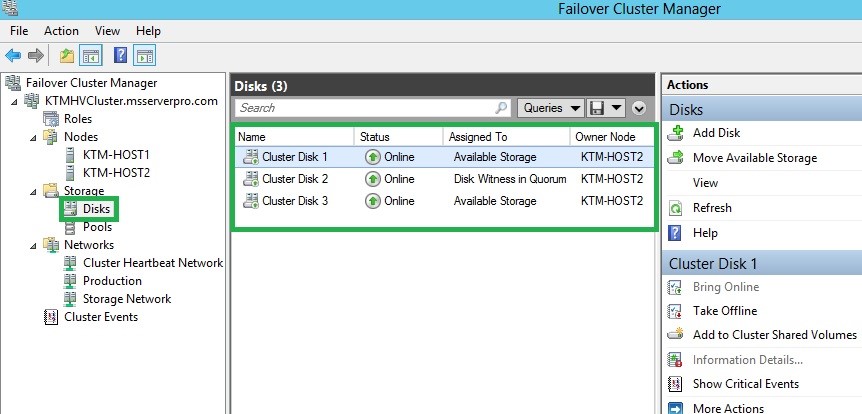
Following cluster’s networks configuration, we are ready to ADD storage disks to our cluster.
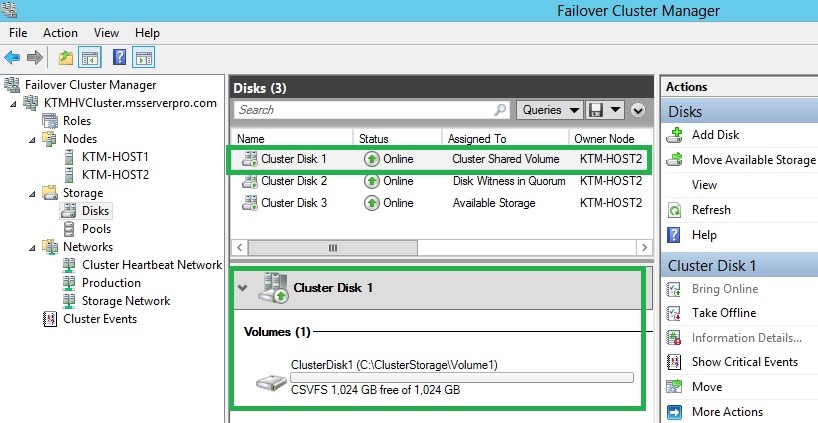
Through Failover cluster manager -> Storage -> Disks, we should see our Cluster Disks marked as “AVAILABLE STORAGE”. Selecting one by one we proceed adding them to “Cluster Shared Volumes”.
WE DO NOT TAKE ANY ACTION ON QUORUM DISK!
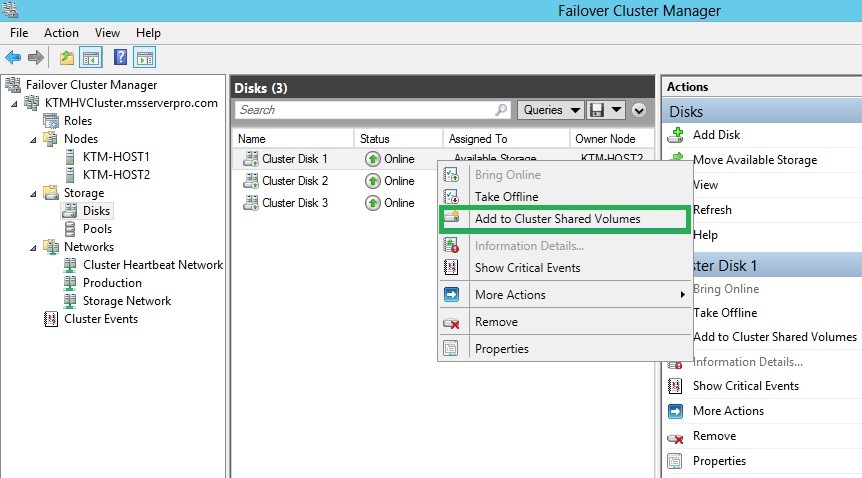
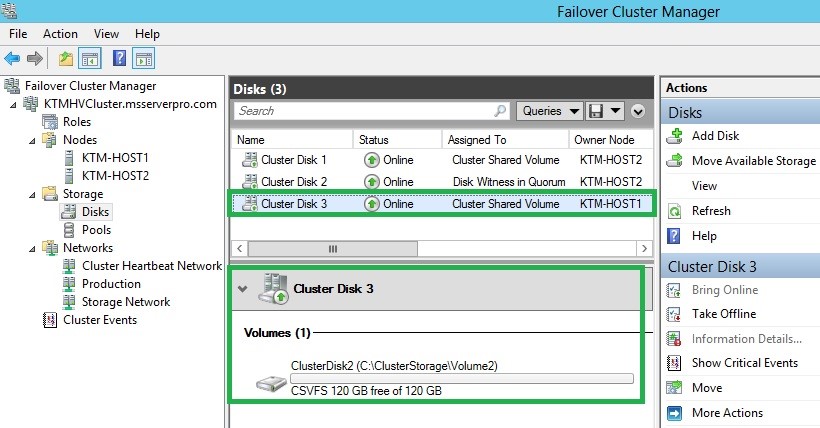
At the end of process all added disks should be marked as “Assigned to Cluster Shared Volume”.
Create a VM and Configure for High Availability or make an Existing VM Highly Available
Test the Failover Cluster by shutting down the node having the VM resources. If you see VMs moving to other node you are ready to start serving clients. Further tests should be made regarding the VMs functionality.
Written and tested by Creative People Team, Costantinos Koptis, Andreas Lavazos and Chrysostomos Psaroudakis


